Showing posts with label canning. Show all posts

Tuesday, February 18, 2014

Winter Canning

For many people canning is a seasonal adventure centering around bountiful summer and fall harvests.  For me it has always been a year round activity, you might remember that I self-taught pressure canning because our freezer wasn’t keeping up with my desire to use the whole chicken.  I’ve also found it to be way more convenient than remembering to defrost or trying to fast thaw sauces and stews.  Last week I went on a little canning binge. Blame the snow, something about it makes me want a steamy kitchen.
ChickenI always make double batches of chicken stock, I have a twenty quart stock pot so it makes sense for me to make a double batch and run the canner twice instead of go through the whole process twice as frequently.  This time I knew I would be needing a lot of stock for soup I’m planning on making tomorrow so I only canned one batch and stuck the rest in the fridge.
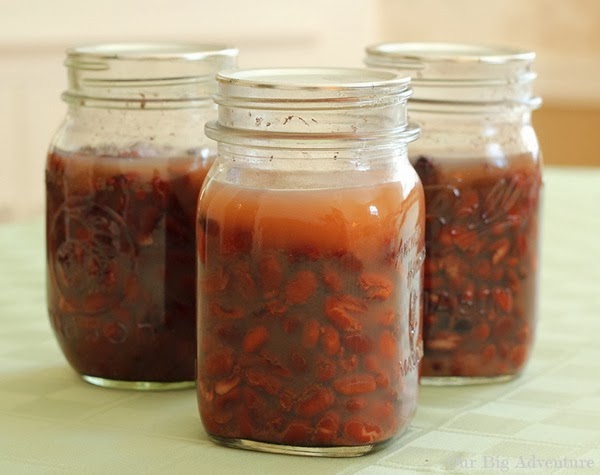
BeansIt seems that most of the canning blogs (this is my favorite) I read have spotlighted canning beans recently.  I have canned baked beans and chili with beans in it but hadn’t ever thought to do regular beans.  Usually I soak and cook a bag (1lb) of beans and batch freeze most of them for later use.  But I’m bad at remembering to defrost.  Now you may be thinking Christine, beans are cheap why not just buy cans.  Two reasons, first regular cans have BPA as a lining, BPA is nasty stuff and I prefer to keep it out of my food; second one 1lb bag of dry beans costs the same as one organic non-BPA lined can of beans (you can only find BPA free cans in the organic sections) one 1lb bag of beans yields five cans worth of beans for an 80% savings.  So I canned eight pints of beans this week too.  Having meal components ready to go will hopefully keep us fed well while we are sleep deprived after baby comes!

Tuesday, November 20, 2012

Pantry

Pretty self explanatory.  I finally have some pantry space. YaY!!!!!  It took me a dozen trips over the stairs but now I will have room to get all my wedding gift kitchen equipment OUT of the dinning room and attic and into the kitchen.  This meant getting all my summer canned produce goodness OUT of the kitchen cabinets because it was taking up far to much real-estate.
It is in the basement, part of a larger basement renovation project which I hope to reveal the first section of soon. The bookcase was already in the basement; yes, there is some discoloration on the bottom from moisture.  I think this bookcase was built in our basement and it is made of solid wood.  So the little bit of discoloration is just that, not buckled disgustingness that happens with particle board. We unloaded it, moving all the painting supplies and electrical supplies to their appropriate places, moved it to the "finished" section of the basement, cleaned it and re-loaded it.  And when I say we I mean Bruce did everything but the pantry-fying.  He's super, I was doing turkey day prep and cooking.

Friday, October 22, 2010

Being a Squirrel: The last installment.

Somehow, I forgot to take any photos of the sauce making, maybe, it was being covered (and covering the kitchen) by tomatoes. 

I started with twenty pounds of Roma tomatoes.  I purchased them for twelve dollars at the farm stand down the street.

I peeled them, by scoring the skin, placing them in a pot of boiling water for a minute then placing them in an ice water bath.

Once peeled I seeded and cored them.  I saved the peels, seeds, etc. in a strainer over a bowl.

After the first few batches I roughly chopped two onions and four cloves of garlic and let them soften in my biggest pot with some olive oil, salt and pepper. Then back to the tomatoes.  Once they had softened I added the tomatoes.

In another pot I put the peels, etc. once the strainer was full to cook the remaining flesh from the peels and cores. Occasionally smushing them with a wooden spoon.

Once all the tomatoes had been processed I added dried spices to the mixture: basil, parsley, oregano and marjoram. Then I let everything simmer for a very long time. After a while I took the pot with the peels and cores, and pressed out the sauce through a strainer.  I did this in batches so that I could discard the remaining skin and seeds and get the most out of them.  I added this to the big pot with the tomatoes. 

After everything had simmered for hours I used a hand blender to break down the tomato flesh then let it simmer until it reached the consistency I wanted, adjusting the spices as I went. I canned four quarts but I probably made five and used one before they were canned.

Sunday, October 17, 2010

How to be a Squirrel

The first thing I made was the turkey stock, honestly it was because two sets of turkey bones took up a third of our fridge. It's made the same way as chicken stock, check that out here
The second thing I made were the baked beans, with a bone from a Honey Baked Ham. My biggest conundrum was what to cook them in, I needed something that was large enough in diameter to fit the bone but also that I could put in the oven.  My 12 inch skillet fit the bill, but the handle is plastic and the cover is glass. 

 
I McGuyver-ed it. 
There is one screw that holds the handle onto the the pot, so I removed it and I used to much water so I never needed a cover, but it I had tin foil would have worked.


The recipe is below, I made a double batch, which made 5 pints with some leftovers.  It probably would have been 6 but I burnt the bottom while I was reheating them to hot pack them.  Also if you don't have a ham bone, salt pork is an acceptable substitute.

 
Baked Beans

 
Ingredients
1 (16 ounce) packages dried navy beans
2 teaspoons salt
3/8 cup (6 tbsp) dark molasses
1/4 cup packed dark brown sugar
2 tablespoons real maple syrup
1/2 tablespoon dry mustard
1/2 teaspoon pepper
small onion
2-3 whole cloves
1 meaty ham bone

Directions
1. Prepare beans: Rinse well and discard any stones or shriveled beans.
2. Soak beans in water in a 5 quart Dutch oven, using the overnight or quick soak method.
Overnight Method: Cover each cup of dried beans with 3 cups of water; let stand for a minimum of 12 hours.
Quick Soak Method: Add beans to boiling water, allowing 3 cups of water for each cup of beans, bring back to the boil and boil for 2 minutes; remove from heat, cover and leave for an hour, then cook in same water.
3. Bring mixture to a boil, add salt, reduce heat, cover and simmer for an hour.
4. Stir in molasses, brown sugar, maple syrup, mustard and pepper.
5. Stud the onion with the cloves; tuck onion & ham bone into the beans.
6. Cover and bake in a 250F oven for about 7 hours; check & stir about once an hour.
7. Add more water to keep beans moist but not too wet OR remove lid to thicken mixture through evaporation; it all depends on your preference for thick or runny!
8. Discard cloves, chop onion and return to mixture.
9. Remove meat from ham bone and return to mixture.

Thursday, October 14, 2010

I'm like a squirrel

Storing things away for winter!  Even though the garden was pretty much a bust I spent all last week canning after raiding mom and dad's freezer (or hearing take that stuff or I'm throwing it away!) and buying 20 pounds of plum tomatoes from the farm stand down the road for $12.
14 Quarts of Turkey Stock
5 Pints of Baked Beans
4 Quarts of Marinara Sauce

Look for details, recipies and weekend adventures soon!

Tuesday, August 31, 2010

Canning Adventure: Part 2

Canning is a complicated process, even more so when canning meats, seafood, tomatoes and other acid foods, which require pressure canning for safety. I don't dare to try to explain how it is done here.  The best online resource I have found is The National Center for Home Food Preservation

This was pre-canning, it is generally recommended that jars be kept in simmering water prior to hot packing.  Our water comes out of the tap simmering so I decided that this was alright.
The pot on the right is the pressure canner without it's cover, water heating to boil.  On the left is the stock heating up for hot-packing. And of course our beautiful stove.
This is not all the jars of stock that I canned this day, I did 5 quarts of chicken stock and 4 quarts of shrimp stock.  I feel like we are going to save quite a bit of money particularly on seafood stock and can't wait to make shrimp risotto with it!
We've also already used some of the stock and I'm proud to report, we're still alive and well.

Thursday, August 26, 2010

Canning Adventure: Part 1

Before I left on my hiatus, I took advantage of my new stove and my pressure canned that I had yet to use.  If you'll remember back to the winter when I had the grand idea to can my own chicken stock, bought all the supplies, including a pressure canner, then realized that I couldn't use on our old and busted stove.

A quick review of the steps to create stock.
Step 1: Eat the protien.
For chicken stock I use the bones from a whole chicken or save the tips from chicken wings and roast them.
For shrimp stock I save the shells.
For veggie stock, you would save the trimmings from veggies.
For beef stock you need beef bones.
Step 2: Bring to a boil and simmer for hours, with aromatics.
Aromatics such as celery, carrots, onions, garlic, herbs, etc.
Step 3: Strain
I use a colander for the big pieces.
Then cheesecloth for the smaller pieces. I use an elastic to keep the cheesecloth on the top of a pitcher, this way I know how much stock I have and its easy to pour back into the pot. (The dish is to catch the drips)
Check back later for the rest of the story.

Wednesday, January 27, 2010

New Big Project

Saturday night I roasted a chicken, more on that and all that I did with it later.  As usual when I roast a chicken I immediately make stock with it, I use alot of stock and I can make about 7 Quarts from a chicken which at approximately 4 dollars for a box (organic, low sodium) saves me $28. I made all this stock then realized that our freezer is full, then, from the breeze way, the box of mason jars started calling my name. "Christine . . . use us to save your stock"  So out came the box, I proceeded to order lots of supplies and now I'm waiting. But look what I found in the box.