Showing posts with label cleaning. Show all posts

Tuesday, February 11, 2014

Progress Everywhere

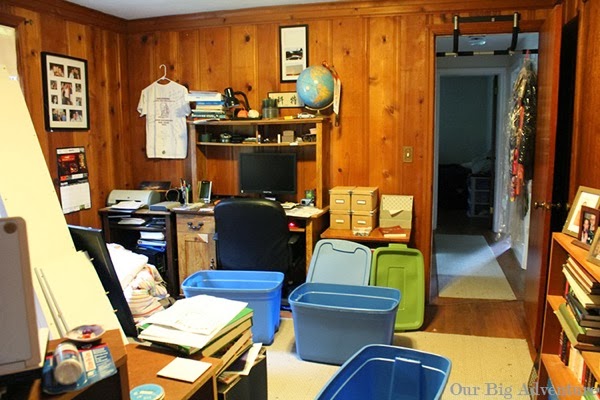
We kept busy this weekend!  I had ordered the futon for the office with a sale code at Overstock during the Superbowl while the paint on the basement floor was drying.  Sunday Bruce emptied out and took apart his desk.  He’d had it for a while and it had moved three times (I’m pretty convinced that particle board furniture has a three time moving limit) and it was time for it to go.  His desk-top computer will relocate to the desk in the basement.  I emptied my filing cabinet in the fall also is going away and the old school desk went upstairs for storage, it’s a cool piece that we will repurpose eventually.  This is what Bruce’s side of the office looked like back in July when I was taking my old desk apart to build the Murphy desk.
OfficebeforeThe futon came after the snowstorm Wednesday and we left it in the garage until Sunday when Bruce took his desk apart and we put it together! That side of the room looks so much more open and I’m sure once the pile of stuff on the desk is put away the whole room will look bigger.  It is a big piece of furniture, but we need the office to also function as a guest room and this folds down to a full sized bed. I can't wait to add a few pillows and for the cushion covers to relax a bit after shipping.
CouchThis weekend we also moved some of the furniture around in the basement, working on the Phase Two layout.  Here’s what it looked like last winter before we started Phase Two:
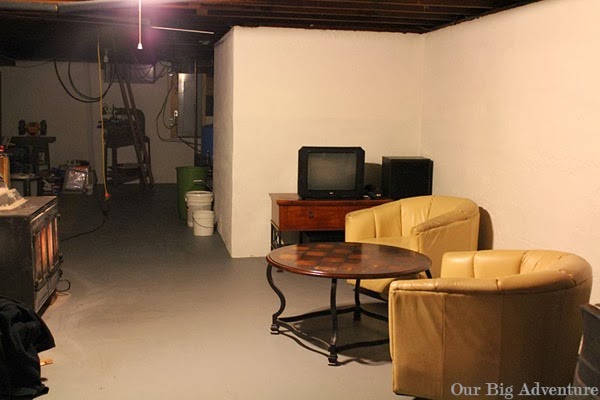
BasementbeforeHere’s where we are now.  Don’t let those club chairs fool you, they are heavy, Bruce got them down from the attic yelling Doctor Jones!!! Doctor Jones!!! as if they were the giant boulders chasing him down the stairs.  Last night after dinner we just sat down there by the stove and hung out for a bit before starting our chores, it was really really nice.
BasementNext is to get the workshop set up so that Bruce can start building the shelving unit for our closet, while he’s doing that I’ll be re-homing everything else that’s stored in the closet in the nursery. He's also working on our taxes and I'm working on filling the freezer and pantry with easy meal options for after Baby arrives.  It feels good to get a few things done every week and know that we are definitely making progress!

Tuesday, February 4, 2014

Basement Adventures: Drylock

This part of Phase two is the beastliest! But I'm happy to say that after seriously hard work for two weeks by Bruce and my parents it is finally done!
When we moved in our basement was a mess, not only was it full of (mostly) crap, but there were also water issues.  During the summer of 2010 I solved the major water issue by filling the holes in the window casings with some Drylok Fast Plug Cement and by cleaning the gutters and adjusting the downspouts.  We have a crack near the dryer under one of the windows that will require Fast Plug before painting, we only get a small puddle there when it rains very hard.  But the basement was still damp, like damp, cardboard gets soggy damp.  Then I saw this post over at YHL.  Problem solved, kind of.  You see our nasty walls already had several coats of some type of paint on them, which, was in several stages of peeling off.  When the paint peels off you get this wonderful stuff called efforescence, which are salts carried through the concrete with the water.  For a long time Bruce thought this was mold, granted, there was plenty of mold growing damp cardboard but it wasn't actually growing on the walls!
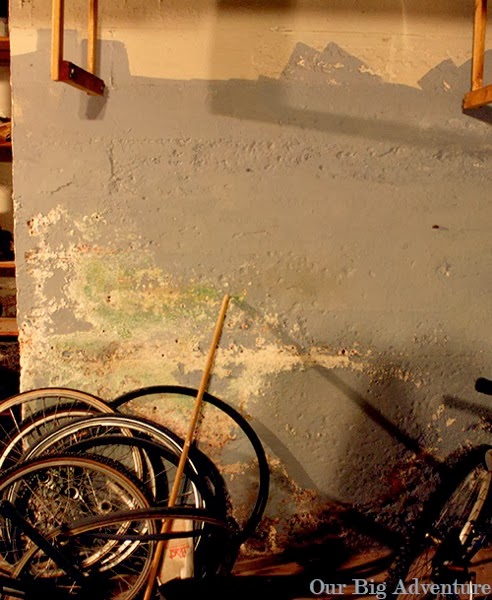
Effo
Originally I thought it would be simple, slap some paint on the walls and floor and call it a day.  Then I read the UGL Drylok packaging.  "If you have existing paint or efflorescence use UGL etch to prepare the surface for painting.  Then I read the etch directions ensure that surface is free of dust, dirt and any oils.  Now it's a process.  First we scraped the walls with wire brushes, trying to get any and all loose paint and concrete away off the walls.

Scrape
Second we cleaned the walls using a mild all purpose soap, we used Mrs. Myers and Lysol, following up by spraying down the walls with water using a pesticide sprayer to make sure we got all the soap off.  Using the sprayer also helped get loose sand and grit out of the nooks and crannies of the walls. Bruce and my dad may have found this tedious and just hooked up a hose to the pressure tank on the pump, which, also worked.

Rinse
Now wet vac up the soapy water and set up some fans, a dehumidifier and crank up the wood stove (if you have one) and wait until everything is dry. Is it dry? Good, now slather on the acid etch, wear a respirator that stuff reaks! Wait 30 minutes. Now rinse off the etch and get the walls nice and dry again.

Vac
Now you can paint, but you can't just roll this stuff on because you cleaned out all those nooks and crannies so buy some cheap paint brushes so you can get the paint nicely into all the nooks and crannies. You'll need two coats to cover the four different colors of paint and bare concrete that are your basement walls.  We found that going over everything with a roller helped create a uniform finish.
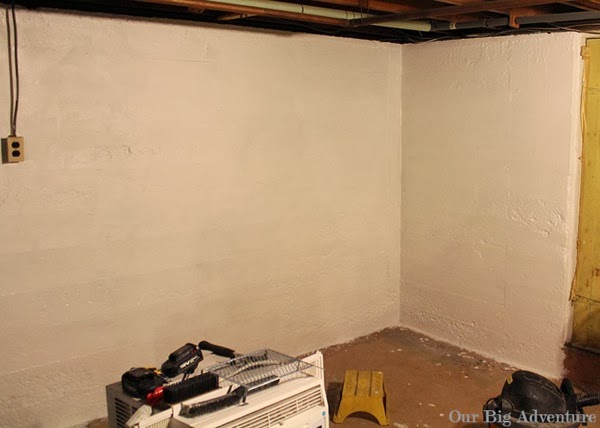
Paint
Admire your hard work.

Floor
Repeat for the floors.  Admire some more.

Admire
We are using UGL latex Drylok on the walls, as of now we have used a total of seven gallons.  We're using latex instead of oil because we couldn't be sure what type of paint was already there.  On the floors we are using Behr's Garage Floor Epoxy, it does scratch when you're moving large items like book cases so be aware of that, our goal for the floors was to have a uniform color and something that will prevent water from coming up and this, so far, is working pretty good. Also when painting the walls we came down onto the floors about four or five inches out from the wall then went over it with the floor paint, for extra waterproofing around the walls.  Now everything looks so fresh and clean, its great motivation to get our work spaces set up so we can get moving on the fun projects to get ready for baby!  I can't thank my parents enough for all their help with this HUGE project the only step I could help with was the wall washing and it would have taken Bruce at least twice as long to finish without their help!!!

Monday, January 27, 2014

Basement Adventures: Planning

It's just one line item on our Big Adventurous List but waterproofing the basement is a huge task with what was a huge post, but I’ve decided to break it down into a few posts.  What make this task even more cumbersome right now is that I can't help with much of it AND getting the basement under control is step one in the cascade of events to pull together the nursery before April.


This is the basic layout of things that we can’t move, or at least can’t move with out a lot of trouble.  I didn’t include the support columns but they run down the middle of the space the long way, there are a few doubles right in the middle of the house near the furnace.  Phase One of the Basement Adventure was the massive cleaning we did after we moved in.


This is the layout of things as they are now(the built in shelving under the stairs is still there somehow the labels got lost!), the wall with the storage shelving on it and the floor from that wall to the bottom of the stairs have already been painted.  Those will not move during Phase Two.  The other storage shelving was all existing, we kept the best of it and moved everything to the middle of the space to paint/waterproof the walls and the perimeter of the floor.  Not included in this layout is furniture that will be part of the Phase two re-arrangement but it has all been moved around for painting.


This is how we will hopefully have things arranged at the completion of Phase Two.  It will give Bruce a nice open space for his workshop, his many, many tools aren’t on the layout but the will most likely line the short wall.  Our wood stove has been a workhorse this winter and running it cuts our oil bill way down but so far we can’t really enjoy it the way we’d like to.  But once the majority of the waterproofing is done it will feel safe to bring the old club chairs down from the attic for some comfy seating and Bruce will set up his desktop on the vintage metal desk that has always been down there.  The purple box around the washer and dryer area will be the only area un-waterproofed, setting up a finished laundry area will be Phase Three.

Wednesday, April 10, 2013

What's For Dinner

This week is kitchen focus week, on my HomeRoutine app.  I try to check one thing off the list in the morning and one thing in the afternoon.  Last night I decided it was time to tackle the freezer.  As I mentioned last week, one of my post-Lent goals is to eat down our what is in our freezer to make room for CSA produce.
This is what I had to work with, we've also had a few incidents recently involving rogue berries and small vegetables.   It was time to take inventory. 
 I took everything out and put it in a cooler.  Then I put it all back in, veggies went in top right, fruit to top left and everything else in the big bottom space. As it went back in I wrote the inventory.
Then I categorized the inventory and re-wrote it.
Then I went back and re-arranged the bottom bin.  Meals on the right, meat on the left, randoms in the middle.  
Tip: Put something flat on the bottom, I used a box of cream cheese brownies and a package of bacon, it prevents things from falling through the bottom!
So now I know exactly what is in the freezer and I can wipe items off as I use them, also I'm hoping it will prevent things like three bags of open blueberries.  Our mudroom alternative is still working great! 
Last tip of the day: Do Not use your broom to sweep corn and blueberries out of the bottom of the freezer, you will get a freezer full of dog hair.  Just get down there and wipe the corn and blueberries out.


Friday, March 1, 2013

Closet Floor: Located.

My parents are going away next week and borrowing our medium suitcase.  We have a luggage set that lives like a set of nesting dolls in our cedar closet, which is a cozy arrangement until you try to use them and the cedar closet vomits all over the office. Like so.
In preparation for this eventuality, I had purchased a new hanging closet organizer and drawers for it at Ikea. Full disclosure my plan was to assess the cedar closet when we were cleaning the office weeks ago but the blitz clean for the appraisal side-tracked me.
I separated the mess into piles: travel supplies, beach towels, summer clothes, Bruce bathing suites, Christine bathing suites and cover-ups, hats, purses, blankets, Bruce bags, Christine bags and TOSS.  "Bags" think backpacks and duffle bags.
Then I loaded up the new organizer, complete with an empty drawer; re-folded everything and loaded up the shelf; all of Bruce's bags went into his snowboarding bag and all of mine went into my largest duffle, duffle stacked onto snowboarding bag on the closet floor. Done.
It is wonderful, don't you love a good Before and After?  It makes me want to put things away and I made a point to show Bruce where everything now lives.  This way he can find things when he is packing and put them away when he's unpacking (he's so much better at unpacking than I am, when I packed for last weekend I had to unpack things from Christmas travel!!!!)  Now, which closet to take remaining summer clothes out of bedroom or cedar ? ? ? 

Thursday, February 7, 2013

Not Quite A Mudroom

Our breezeway isn't heated, which is sad because it would make for a Pinterest~able mudroom.  Our coat closet is in the front hallway, by the front door, which we never use; this makes the closet good for storage but not our everyday coats.  For awhile now we have had two command hooks on the side of the fridge to catch our coats as we come in the door and the kitchen table was a dumping ground for everything else. Apart from what is labeled in the photo below there are hats, gloves, mail, flashlights and random things to be put away elsewhere.
I added two more medium command hooks for jackets and sweatshirts, two small command hooks for lunch boxes, purses or gym bags, a folder (from Martha Stewart's line from Avery at Staples) for menus and such, and replaced the calendar pages (but kept the dry erase board).  I hung two hooks by the door for our keys and moved the hook for Kennay's leash up so that the leash doesn't get stuck in the door or drag on the floor.  Mail is sorted and placed on desks in the office when we bring it in from the mailbox.
 Our lunch boxes now live on top of the fridge (I took this in the morning after I had packed Bruce's lunch which is why it's on the table.) The basket on the table catches hats and gloves, in the summer it will catch garden supplies.  The dishes are waiting to go back to my mom.  I've instituted a two pair rule for under the kitchen table.  Bruce has house shoes, running shoes, work shoes, basement shoes, take the dog out shoes and they all end up under the table because the breezeway is too cold.  Now he gets two pair the rest go in the closet where they belong.

Friday, January 25, 2013

Cleaned and Decorated!

I'm making serious progress with my organizing goals.  I'll have the kitchen progress up soon, we've made serious progress in the living room and babysteps in the office.  The dining room is done.  To remind you this is what I was starting with.
 Christmas decorations still up, leaf still in the table (from Thanksgiving) table littered with presents and present wrapping supplies, and the sideboard an over-flow for the table. After putting decorations and presents away, all that was left was the table, I took the leaf out, spread a clean table cloth, vacuumed and dusted.  It looked very empty.  So I found my little box of Valentine's Day supplies and spread them around, it took all of ten minutes but gives the room a bit of character.
I swapped our stainless steal cocktail shaker for the red-wrapped one, ornaments in the vase for Valentine's garland with silver hearts and ornaments around the candle for more candles.  The red bow was left-over from Christmas. The red garland also went around the candles on the table centerpiece.
It makes such a big difference to have clean, organized spaces in our home; it energizes me to do some projects around the house now that I don't feel like we live in a pit!

Friday, January 18, 2013

What if AWAY doesn't exist?

Our kitchen has a weird layout, which makes it a weird space complete with a weird, door-filled hallway.
  Now, one might think there is plenty of cabinet space and for your average domestic goddess it might be.  But not for one that has a love for kitchen gadgets.  Avocado slicer, got it. Corn stripper (here we are referring to a small device that removes cooked corn from the cob not dancers in the Mid-West), got it. Every attachment for a Kitchen-Aid stand mixer, not quite but I'm pretty damn close.  You get my point, lots of kitchen stuff and things weren't always getting AWAY because AWAY didn't exist or was to hard to get to.  This is compounded by the size of our cabinets, the shelves aren't adjustable and they aren't deep enough. Something had to give.  So we started a pantry downstairs, which helped get every attachment known to the cooking gods (but the grain mill) into the cabinets and off the dining room floor. But then the newly acquired ceramic non-stick weren't playing nice in the pot cabinet and one didn't fit at all.  So I started hanging it over the pizza peel which as you can see is on our weird hallway to the office.  
Then we got a massive carving board for Christmas which need a home also. I decided that weird hallway wall was a great place to hang them.  
Bruuuuuuuuuuce can we hang more stuff on the wall? 
Yea babe just tell me where to hang them.  
Fast forward eight weeks.  While making dinner this week I was planning.  First I tried to eyeball it. No dice.  So ala YHL I cut the shapes out of paper and stuck them on the wall until I found an arrangement I liked, then said ok put the hooks there. 
And he did. Now the ceramic non-stick plays nice, beautiful wood looks beautiful.  Most importantly we used dead wall space and things are AWAY.

Tuesday, November 20, 2012

Pantry

Pretty self explanatory.  I finally have some pantry space. YaY!!!!!  It took me a dozen trips over the stairs but now I will have room to get all my wedding gift kitchen equipment OUT of the dinning room and attic and into the kitchen.  This meant getting all my summer canned produce goodness OUT of the kitchen cabinets because it was taking up far to much real-estate.
It is in the basement, part of a larger basement renovation project which I hope to reveal the first section of soon. The bookcase was already in the basement; yes, there is some discoloration on the bottom from moisture.  I think this bookcase was built in our basement and it is made of solid wood.  So the little bit of discoloration is just that, not buckled disgustingness that happens with particle board. We unloaded it, moving all the painting supplies and electrical supplies to their appropriate places, moved it to the "finished" section of the basement, cleaned it and re-loaded it.  And when I say we I mean Bruce did everything but the pantry-fying.  He's super, I was doing turkey day prep and cooking.

Wednesday, September 22, 2010

The Unexpected Project

I realized I never expanded on the Unexpected Project/Adventure that I had mentioned back in August.  We replaced the basement hatchway doors which included repairing the concrete of the top step.  While Bruce was removing the old doors and frame I scraped off the peeling paint and remember this post from YHL. So we picked up some Drylok while we were at Home Depot getting supplies.  I finally got the stairwell painted yesterday, I had been dreading it because there was a lot of prep to do.  I'm sorry I don't have a before to show you but it was 2 shades of old masonry paint that was peeling and chipping concrete.


Nothing really glamorous but definetly a big improvement, this is not the major water seepage area but my plan is to do the entire basement, big basement, big plan.  The next step in the plan is to seal the windows which (while cleaning) I found to be not only filthy but also one of the water problem areas.

Total cost of the doors project was just over $400, including doors, concrete and paint.  We choose to use the latex base Drylok because I'm pretty sure that the existing paint is latex.


Monday, July 26, 2010

Weekend Adventure: Hazmat drop-off.

As many of you know, our house was not quite "empty" when we purchased it.  The former owners were also former owners of the town hardware store, so we acquired a lot of stuff with the house, some good, some bad, some indifferent.  There was a lot of questionable old paint and cleaning products, some things we weren't even sure of their origin. We had the potential to blow up.  This photo show one of the places in the house where these things were stored, there were spots!

In New Haven county (were we live) the regional water authority offers free drop off of scary household chemicals, also waste oil and antifreeze.  So Saturday morning we loaded up the big red truck and headed down!  It took us at least an hour to get everything from the basement and garage, and it took them almost as long to unload it.

It is such a relief to know that all those hazardous chemicals are not longer lurking in the basement and garage.  It also gives use more space to organize and store our own tools and project supplies!

Tuesday, July 13, 2010

Butcher Block Make Over

This butcher block was originally my Bumpa's, after he passed away it went to my dad. It then sat in their basement for a few years. I dug it out sometime in jr. high and sanded it by hand and it became part of my parents' kitchen.  A few years ago they re-did their kitchen and Bumpa's Butcher Block was relegated to the basement once again.  So when we were getting ready to move into the house I claimed it as my own. 

It's been living in the corner of the kitchen since my dad came down with all my furniture, this is the closest photo I have that shows where in the kitchen it was (the arrow is the actual location it has spent most of its time).  When we needed to move it for some kitchen changes (more on that soon) I decided it was a great time to refinish it.

To the basement it went, there is some marker transfer, some moisture rings, and at least fifteen years of use and grime.

After a pass with 60 grit, then 110 and finally 220 with my trusty palm sander. I originally started with 220, being cautious and used 3 pads on the first pass, then went through 5 of 110 before I gave up and went for 60 grit. There was alot of grime! Remember, if you are sanding wood go with the grain!

I wiped it down thoroughly then slathered on a beeswax and food grade mineral oil product made for butcher blocks and cutting boards, that I picked up at Home Depot.  I heated the product up with hot water first, then painted it on with a 3 inch foam brush. And let it soak for twenty minutes.

After the soak I wiped off the excess and buffed it.  The stains are mostly gone but it still has all the character from years and years of Bumpa's cooking!
This is how it looks in the kitchen! Notice something else used to be here . . . (hint, hint)

Monday, June 7, 2010

The Kitchen Cabinets

I was inspired this weekend (during the rain on Sunday) to participate in Tackle it Together from Young House Love, our cabinets definitely need it! I'm going to do this in stages because our "dry" food is spread among many (many) cabinets. For stage 1 I tackled our "Top Pantry" cabinets, they house all our pantry goods minus the cans, which are down below with the Tupperware.  They are also the source of those nasty little bugs and I was determined to find the source. Left is the before photo and right is the after photo!


This doesn't look like a huge transformation, this skinny cabinet is fairly obstructed by the fridge but we still use it for breakfast items and some little appliances.  All I really did here was move all the mixing appliances (there are: a magic bullet blender, a stick blender affectionately called the "boat motor", and a hand mixer) to the top shelf, arrange the non-cereal items in the middle, and the big cereal boxes on the bottom (they are the most used.  We really like to keep this right near the fridge so that the cereal is close to the milk.

The middle cabinet took the most work, I took everything out and went through it all.  Here there was a lot of "drink stuff" lemonade, ice tea, hot coco and tea, lots of tea.  I threw out anything I had before moving to CT (some of the "pantry" from my Amherst apartment was packed with my kitchen supplies and stored with them and when I unpacked them here they just moved into the cabinets with everything else).  I also combined some of the boxes of tea.  Everything we back in groups, bottom shelf drink mixes, middle shelf mixes (for soups and dips), and the top shelf stays the same with the French Press, coffee and can opener. This cabinet is also partially obstructed by the fridge so the stagger you see is purposeful as end of the middle shelf is hard for me to reach.

I used some wire bale jars that came with the house to store my single serving drink mixes, I really like them and use them a lot so if I forget to put it away it's a little more decorative on the counter.

The end cabinet still looks cluttered but now I know where everything is and things are grouped more appropriately.  The pastas, rice and grains are on the bottom (for easiest access for the vertically challenged, then snacks, then nuts on the top. I tossed about half of the different types of nuts I had that were past their expiration date and "feeding" the nasty bugs but I still have a good supply to make my own snack mixes.  They also gave me some ideas for things with almond crust or peanut candy!

Monday, May 17, 2010

Note to Self:

A little goes a long way!

Awhile back, I spilled some laundry detergent, ok I spilled a lot of laundry detergent.  The bottle fell off the top of the machine and soaked up an entire bath towel. When I finally got around to tossing the towel in the machine it washed 6 loads of laundry, the first time was clearly way to much. I still haven't figured out how to secure the detergent dispenser to the top of the machine . . . any suggestions?